Basic chatbot: Keeping context awareness
February 08, 2026
Welcome back! I hope you had a good holiday season and a great start to the new year. I ended up taking a little more time than I thought. Between holidays, traveling, and getting sick I managed to work on some coding, but could not get around to writing a blog post. Anyways, I’m back with the next post.
This week, I will demonstrate the basics of building a personal chatbot with a focus on prompt building and ensuring the chatbot remembers context. The models we will be using are GPT-2, which is the same as the model used in the last post, and GPT-4.1 nano. I will not be fine-tuning the GPT2 model since the point of this post is to show how to build a chatbot that maintains context, but if you are building one with a specific task in mind, you should align it to the task by fine-tuning the model as discussed in the previous post. GPT-4.1 nano does not need fine-tuning.
A chatbot differs from what we’ve previously covered in a specific aspect, which is context. A decoder, as in the previous post, is good for single-turn text generation but it will not be able to ‘‘hold’’ a conversation since they are inherently stateless. On the other hand, chatbots need to be able to remember what you previously said in the conversation and keep it for when you ask something related to it. For example, if you ask ‘‘how long does it take to get from San Francisco to Los Angeles?’’ The chatbot will answer your question. But if you then ask ‘‘once there, where can I get some good Mexican food?’’ The chatbot will no longer know that you are traveling from San Francisco to Los Angeles, so it will not know that you are trying to find Mexican food in Los Angeles.
This difference makes chatbots inherently more challenging to design since they must now maintain a dialogue state and generate fluent responses. We must constantly reconstruct the context and feed it back into the model. A few ways of doing this are:
- Sliding window memory
- Keeps the last $N$ messages and feeds them back into the model.
- This approach keeps the context prompt relatively small and reduces the computation needed to generate a response.
- Summarized memory
- Summarizes past dialogue and keeps last $N$ messages.
- This approach helps preserve important details that may have been discussed early in the conversation.
- Structured memory
- Stores information that is considered to be relevant, such as user preferences and tasks.
- This approach can help minimize the amount of information that is contained in the context prompt since it avoids unnecessary and redundant details. It also has the advantage of keeping the memory state separate from the conversation state since it is more so like storing information in a database that the model can reference.
For our application, we will use the sliding window memory since it is the easiest to implement. In general, care must be taken with this method since long histories may exceed the model’s token window, causing truncation or memory loss of earlier messages. This won’t be an issue in our case since we are just testing the chatbot. Let’s jump into it.
As always, the first step is to define our parameters in a .yaml file and use SimpleNamespace to store them. In this case, the parameters are the following:
{
  "model_name": "gpt2",
  "api_model_name": "gpt-4.1-nano",

  "seed": 42,
  "n_turns": 6,

  "log_dir": "../outputs/logs/",
  "state_dir": "../outputs/state/"
}
There are a few new parameters here. Let’s describe them:
n_turns- This parameter defines how many turns in a conversation the chatbot will remember. Here, the chatbot will remember the last
6turns.
- This parameter defines how many turns in a conversation the chatbot will remember. Here, the chatbot will remember the last
log_dir- This parameter indicates the location where the log file will be stored. This file keeps track of everything that occurs in the chat, including time stamps.
state_dir- This parameter indicates the location where the conversation state file will be stored. This keeps track of the chat input and output.
Before we jump into the class that constructs the chatbot, let’s look at how memory is stored. Below is the memory class (longer docstrings are suppressed for brevity. See the file memory.py for more information):
class ChatMemory:
    def __init__(self):
        self.turns = []

    def add_user(self, text: str):
        "Adds the user's text to turns list."
        self.turns.append(f"User: {text}")

    def add_assistant(self, text: str):
        "Adds the Assistant's text to turns list."
        self.turns.append(f"Assistant: {text}")

    def last_n_turns(self, n: int = 6) -> list[str]:
        "Grabs the last n turns in the list."
        return self.turns[-n:]

    def clear_memory(self, path: str = "conversation_state.json"):
        """Clears the stored conversation (memory) in turns."""
        self.turns = []
        self.save(path)

    def save(self, path: str = "conversation_state.json"):
        """Saves the conversation state to a JSON file."""
        path = Path(path)
        path.parent.mkdir(parents=True, exist_ok=True)

        with path.open("w", encoding="utf-8") as f:
            json.dump({"turns": self.turns}, f, ensure_ascii=False, indent=2)

    def load(self, path: str = "conversation_state.json"):
        """Loads the conversation state from a JSON file and adds it to turns."""
        path = Path(path)

        if not path.exists():
            self.turns = []
            return

        with path.open("r", encoding="utf-8") as f:
            data = json.load(f)
        self.turns = data.get("turns", [])
We see that a list labeled as turns is defined in the constructor. This is were the sliding window memory will be stored. The next two methods appends the user text and the assistant (chatbot) text, respectively. The method that follows indexes the last n turns in the memory list. In our parameters, we defined n_turns. This method is where that parameter will be used. The next method clears the turns list and logs the action. Finally, the last two methods save and loads this list from and to a JSON file. The load method also adds the conversation state to the turns list. There’s nothing really complicated about this class. It’s pretty straightforward how the memory bookkeeping is done.
Let’s move on to the prompt-building. Below are the functions used to put together the prompt (see the file prompt_utils.py for more information):
SYSTEM_PROMPT = "You are a helpful assistant."

def build_prompt(user_message: str) -> str:
    """Builds the output prompt template for the chatbot."""
    return (
        f"System prompt: {SYSTEM_PROMPT}\n"
        f"User: {user_message}\n"
        f"Assistant:"
    )

def build_prompt_with_history(
    history_turns: list[str],
    user_message: str
)-> str:
    """Builds the output prompt template for the chatbot with previous history."""
    history_text = "\n".join(history_turns)
    if history_text.strip():
        return (
            f"System prompt: {SYSTEM_PROMPT}\n"
            f"{history_text}\n"
            f"User: {user_message}\n"
            f"Assistant:"
        )
    else:
        return build_prompt(user_message)

def extract_assistant_reply(text: str) -> str:
    """Extracts the chatbot's reply."""
    if "Assistant" in text:
        return text.rsplit("Assistant:", 1)[-1].strip()
    return text.strip()
These are just as straightforward as the memory class. Let’s break each part down. Up top, we have a global variable that gives the chatbot instructions. I kept it very simple for this example, but this part can be as long and focused as you need. Think of this variable as your way of telling the chatbot how to act. You can tell it to get straight to the point, be as verbose as possible, or even to be strict and rude. It all depends on what you are looking for in an assistant. The next part put together the template for the prompt. We can see that it has the form
System prompt: "
User: "
Assistant:"
with the different fields being filled in accordingly. The next function is where memory is taken into account. This function grabs the memory list and appends it to the prompt template in such a way so that the model can first see how you want it to behave, then see the chat history between you and itself, and finally gets to the user input text. If there is no memory, the function defaults to the original template. The final function extracts the chatbot’s reply. This is done so that it can be saved to memory later without saving redundant information such as the system prompt, history, and user message. The details of this step are found in the class that builds the chatbot.
That’s pretty much it for the memory and prompt building! Pretty simple right? Let’s look at how all this is put together by going over the chatbot class (docstrings are suppressed for brevity. See the file chatbot.py for more information):
class MyChat():
    def __init__(
        self,
        model_name: str,
        n_turns: int,
        state_dir: str,
        log_dir: str,
        state_fname: str = "conversation_state.json",
        log_fname: str = "chat_logs.jsonl",
        api_key: str | None = None
    ):
        if api_key:
            self.lm = OpenAIChat(model_name, api_key=api_key)
        else:
            self.lm = LocalLM(model_name)

        state_path = state_dir + state_fname
        log_path = log_dir + log_fname

        self.memory = ChatMemory()
        self.memory.load(state_path)

        self.n_turns = n_turns
        self.state_path = state_path
        self.log_path = log_path

    def chat(
        self,
        user_message: str
    ) -> str:
        prompt = build_prompt_with_history(
            self.memory.last_n_turns(self.n_turns),
            user_message
        )
        text = self.lm.generate_text(prompt)
        reply = extract_assistant_reply(text)

        self.memory.add_user(user_message)
        self.memory.add_assistant(reply)
        return reply

    def respond(
        self,
        user_message: str,
        chat_history: list | None
    ) -> tuple[list, str]:
        if chat_history is None:
            chat_history = []

        chat_history.append({"role": "user", "content": user_message})

        try:
            reply = str(self.chat(user_message))
        except Exception as e:
            reply = f"[ERROR] {type(e).__name__}: {e}"

        log_output(self.log_path, user_message, reply)
        self.memory.save(self.state_path)
        chat_history.append({"role": "assistant", "content": reply})
        return chat_history

    def clear_chat(self) -> list:
        self.memory.clear_memory(self.state_path)
        log_output(self.log_path, "Memory cleared", "")
        return []
Looking at the constructor, we see that two different models are given as options for this chatbot: a local model (GPT-2) or a newer OpenAI API model. This class is not limited to these models and can be used for any model as long as the appropriate code is built to utilize it. After the proper paths for the logs are created, the memory class is initialized and the load method is called to load in previous states if they are available.
The next method, called chat, is what builds the prompt. It calls the function build_prompt_with_history found in the prompts_utils.py file that we discussed earlier. From here, it passes the prompt to the language model and that generates a response. From that response, the function extracts the reply and adds the user question and the chatbot’s reply to memory. The reply is then outputted. The method that follows puts together all the functionality needed to utilize the chatbot. It takes a list of the chat history and appends the user and the user message to it. It then calls the chat method to get a response from the language model. This response and the user message are saved to the log file and the conversation state file. The final step is then to append the chatbot’s reply to the list that contains the chat history. Finally, the last method in this class is used to clear the chat history, which is to essentially start a fresh chat. This action is logged in the log file, as well.
We have now gone over how memory is stored, how the prompt is built, and how it is all put together into one coherent class that encompasses the chatbot. We can stop here and we would have created a chatbot that takes in a message and outputs a reply. Instead, we can go one step further and work all this into a user interface (UI) like all the modern chatbots have. For this task we will be using Gradio. The code can be found in the gradio_ui.py file. I won’t go into the details regarding the code used for implementing the UI since most of it can be found in the documentation [1].
For the final step, we write a helper function that instances the MyChat class and the Gradio interface, and finally launches the UI.
def MyAssistant(
    model: str,
    n_turns: int,
    state_dir: str,
    log_dir: str,
    api_key: str | None = None,
    share: bool = False,
    inline: bool = False
):
    bot = MyChat(model, n_turns, state_dir, log_dir, api_key=api_key)
    demo = chat_interface(bot)
    demo.launch(share=share, inline=inline)
Once you run this function, click the local URL that appears and a window opens that contains the chatbot UI. Here is a screenshot of what that looks like:
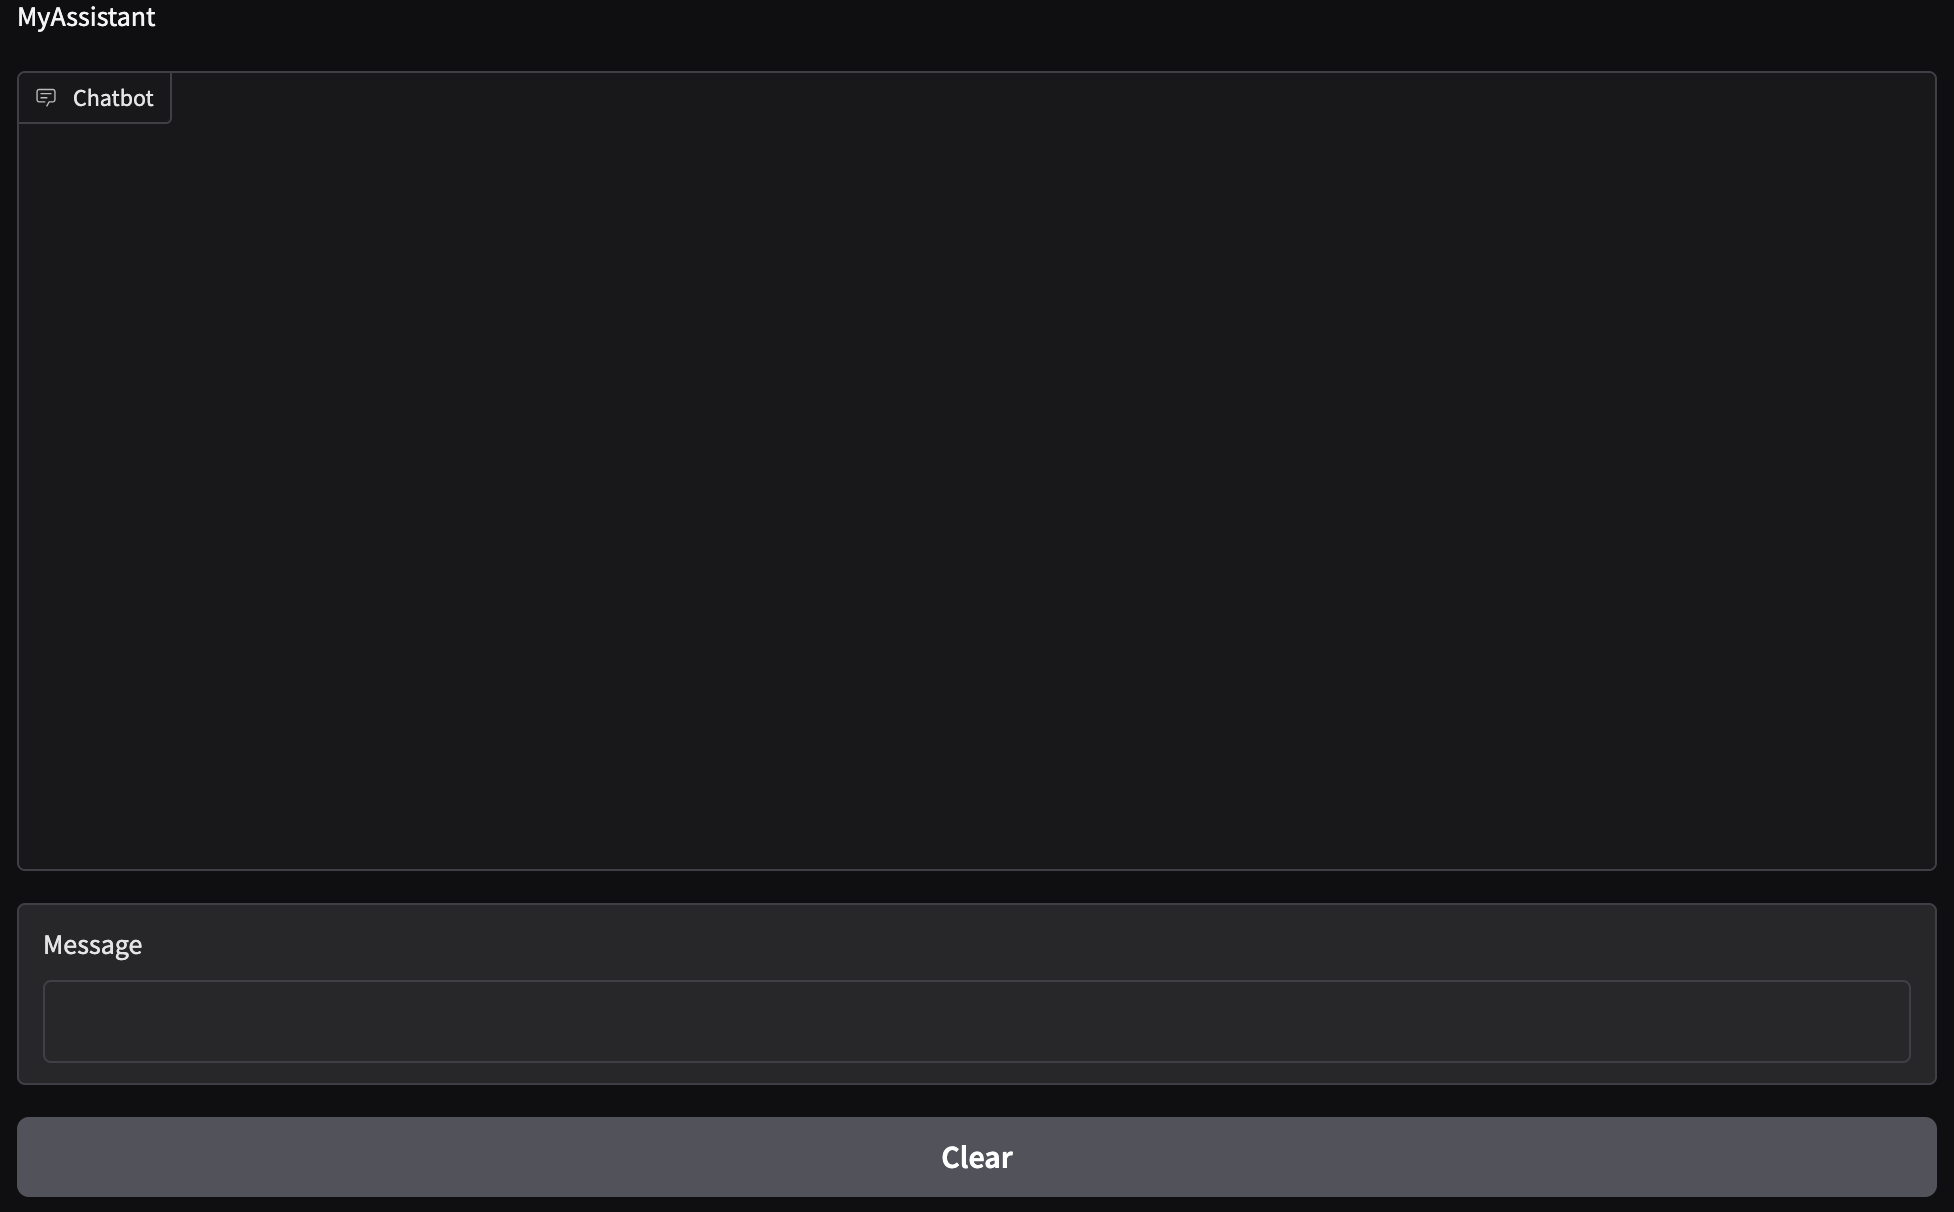
We have three boxes with three labels:
- Chatbox
- Where the chat takes place
- Message
- Where the user types their input
- Clear
- Used to clear the chat and wipe the stored memory.
Let’s test our San Francisco/Los Angeles example and see how well the chatbot responds using the local model:
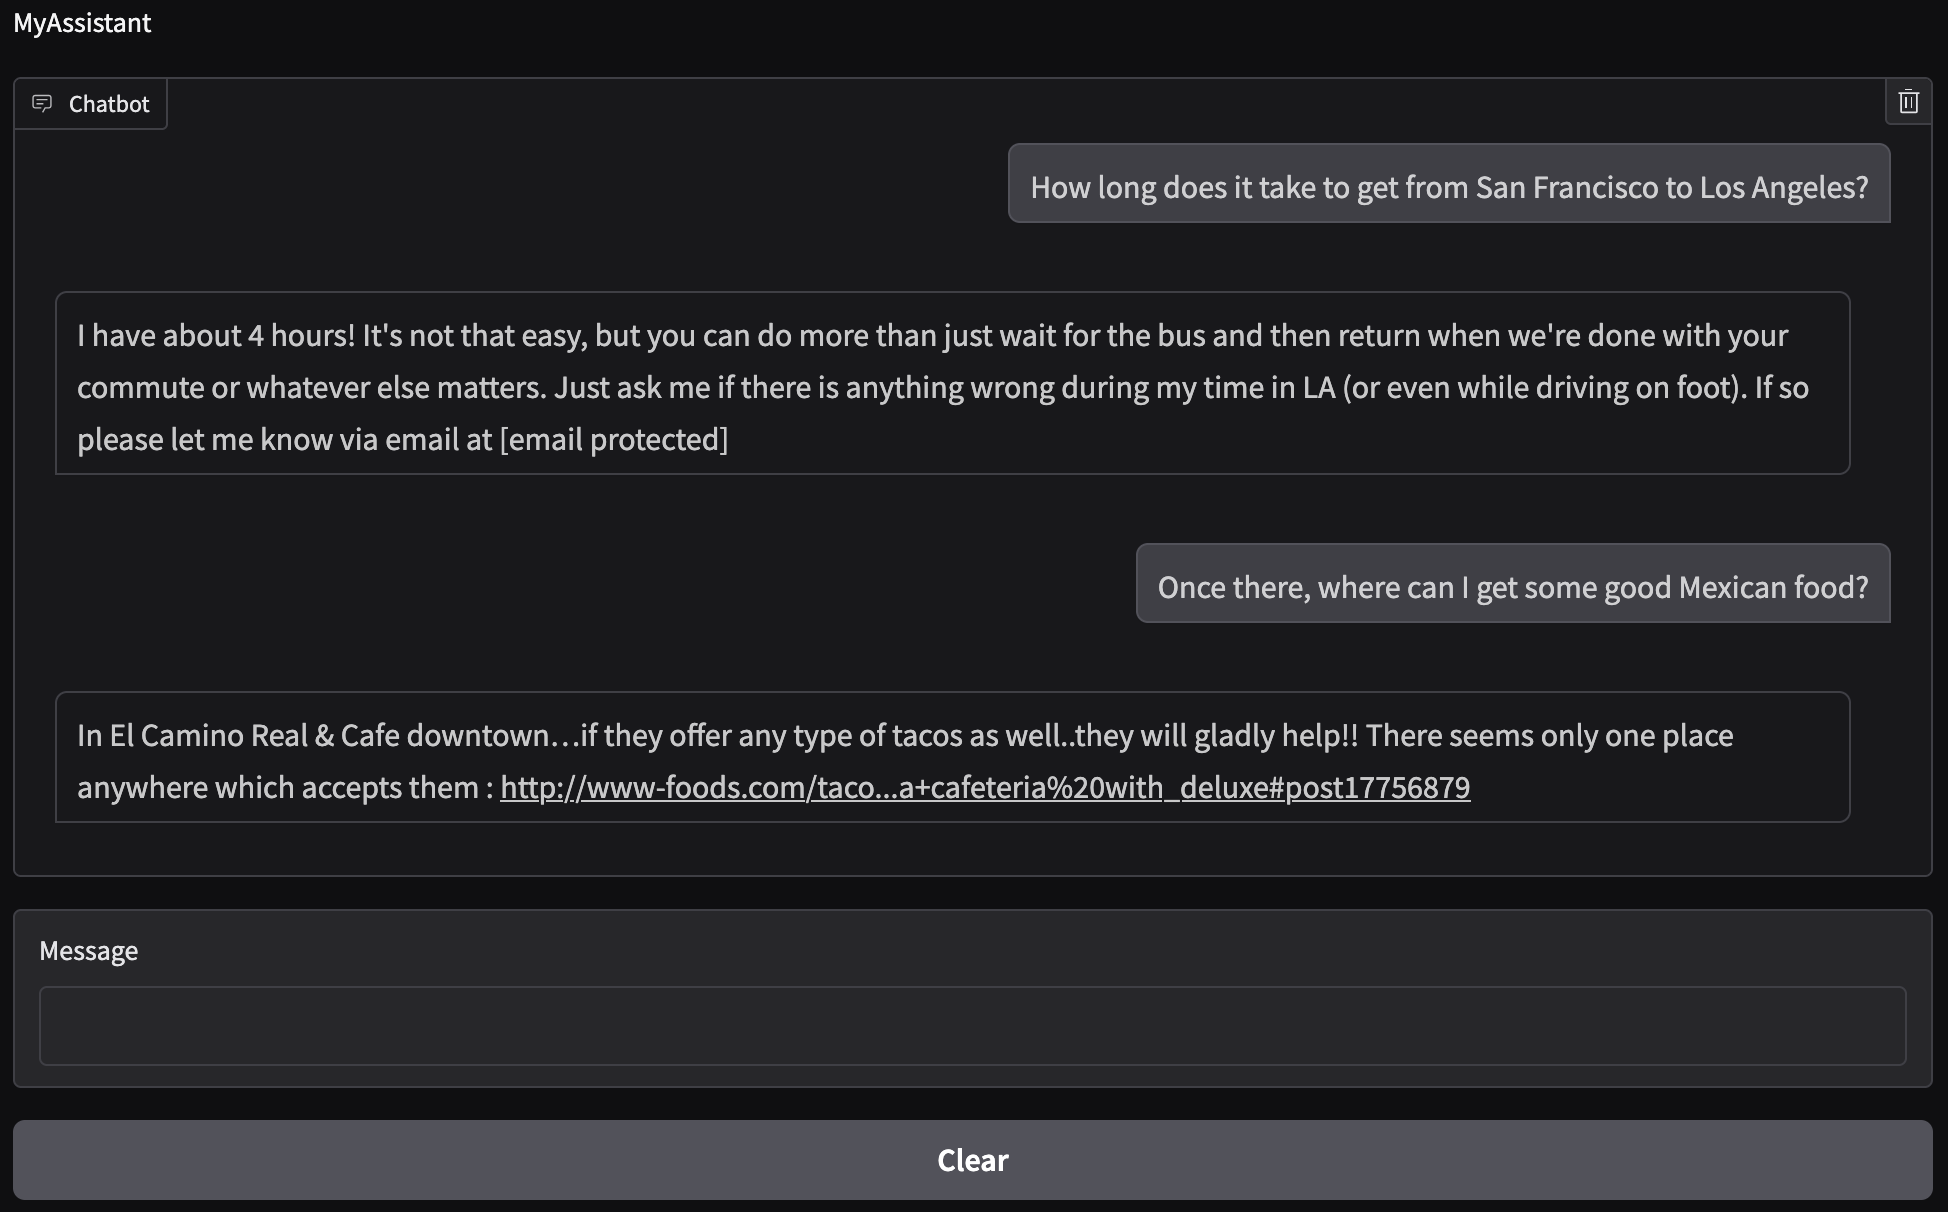
While the local model does produce something coherent, it does not answer our initial question and it definitely did not understand what we were asking. The answer to our follow up question also does not make sense since there is no El Camino Real & Cafe in Los Angeles. The issue with the local model may be that is it not fine-tuned to the problem at hand. It is also an older model so its reasoning is not as good as the current models. Considering both of those options, it is reasonable to believe that the model would not give us what we expected.
Instead, let’s try using a more current model. The model of choice will be GPT-4.1 nano by OpenAI. More information on this model can be found here. Note that to use this model (and similar models), you need to purchase an API key from OpenAI. Be careful in integrating your API key with your code since others can also use your API key. This can result in your credit card being overcharged from the unexpected token usage. Read online documentation on how to store and use your API key before you purchase one. As mentioned before, these models are stateless and do not inherently retain memory between API calls. They only know what you asked it in that moment, not what you asked before or what it previously told you. In other words, even though we are using GPT-4.1 nano from OpenAI, we would still need to build the eco-system (memory, prompt, etc.) around it to be able to use it as a chatbot.
The code to call this model is similar to the one used for the local model (with slight variations) so I will not go over it. See the file model_openai.py for more information. Let’s ask the same questions as before and see how well the model responds:
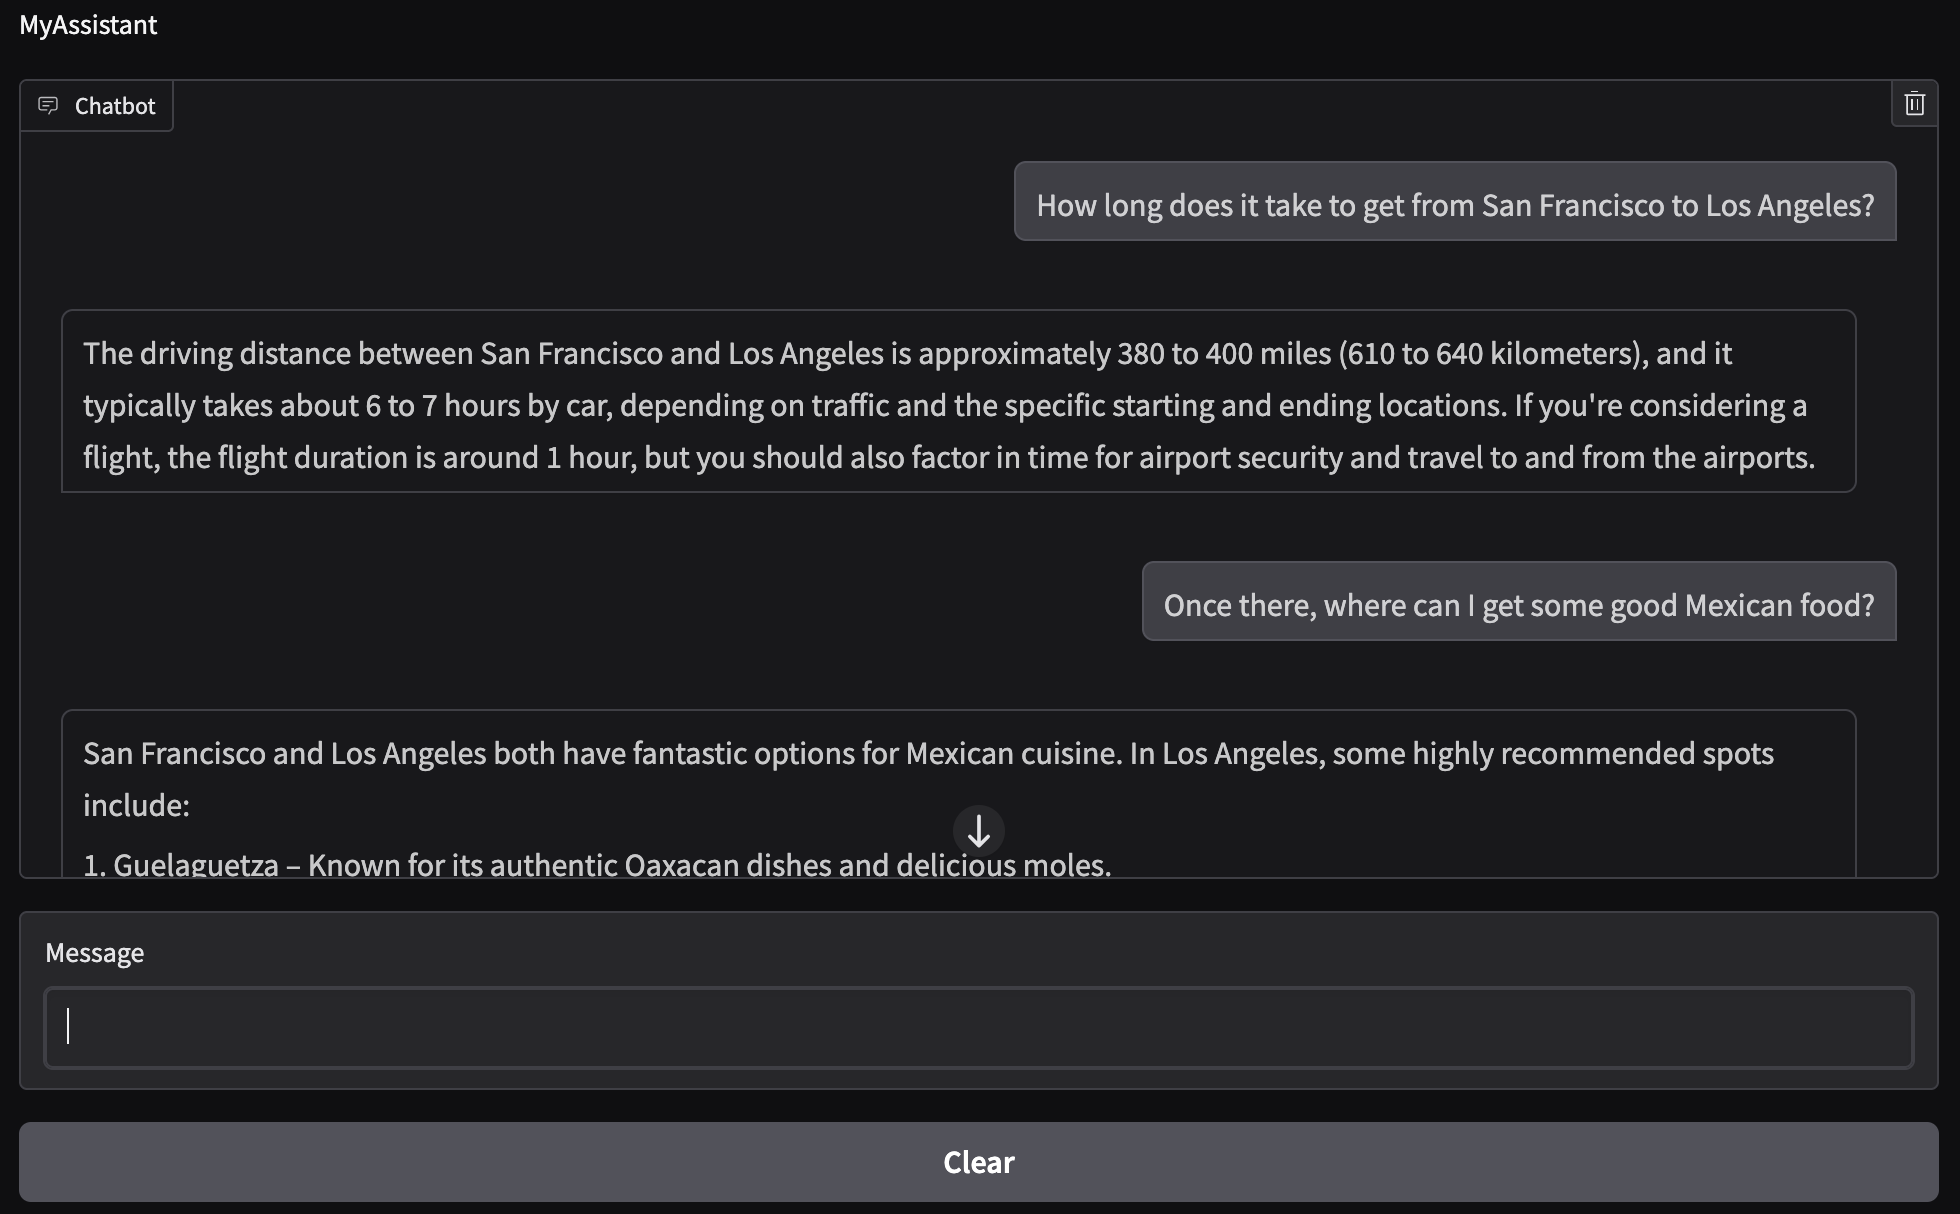
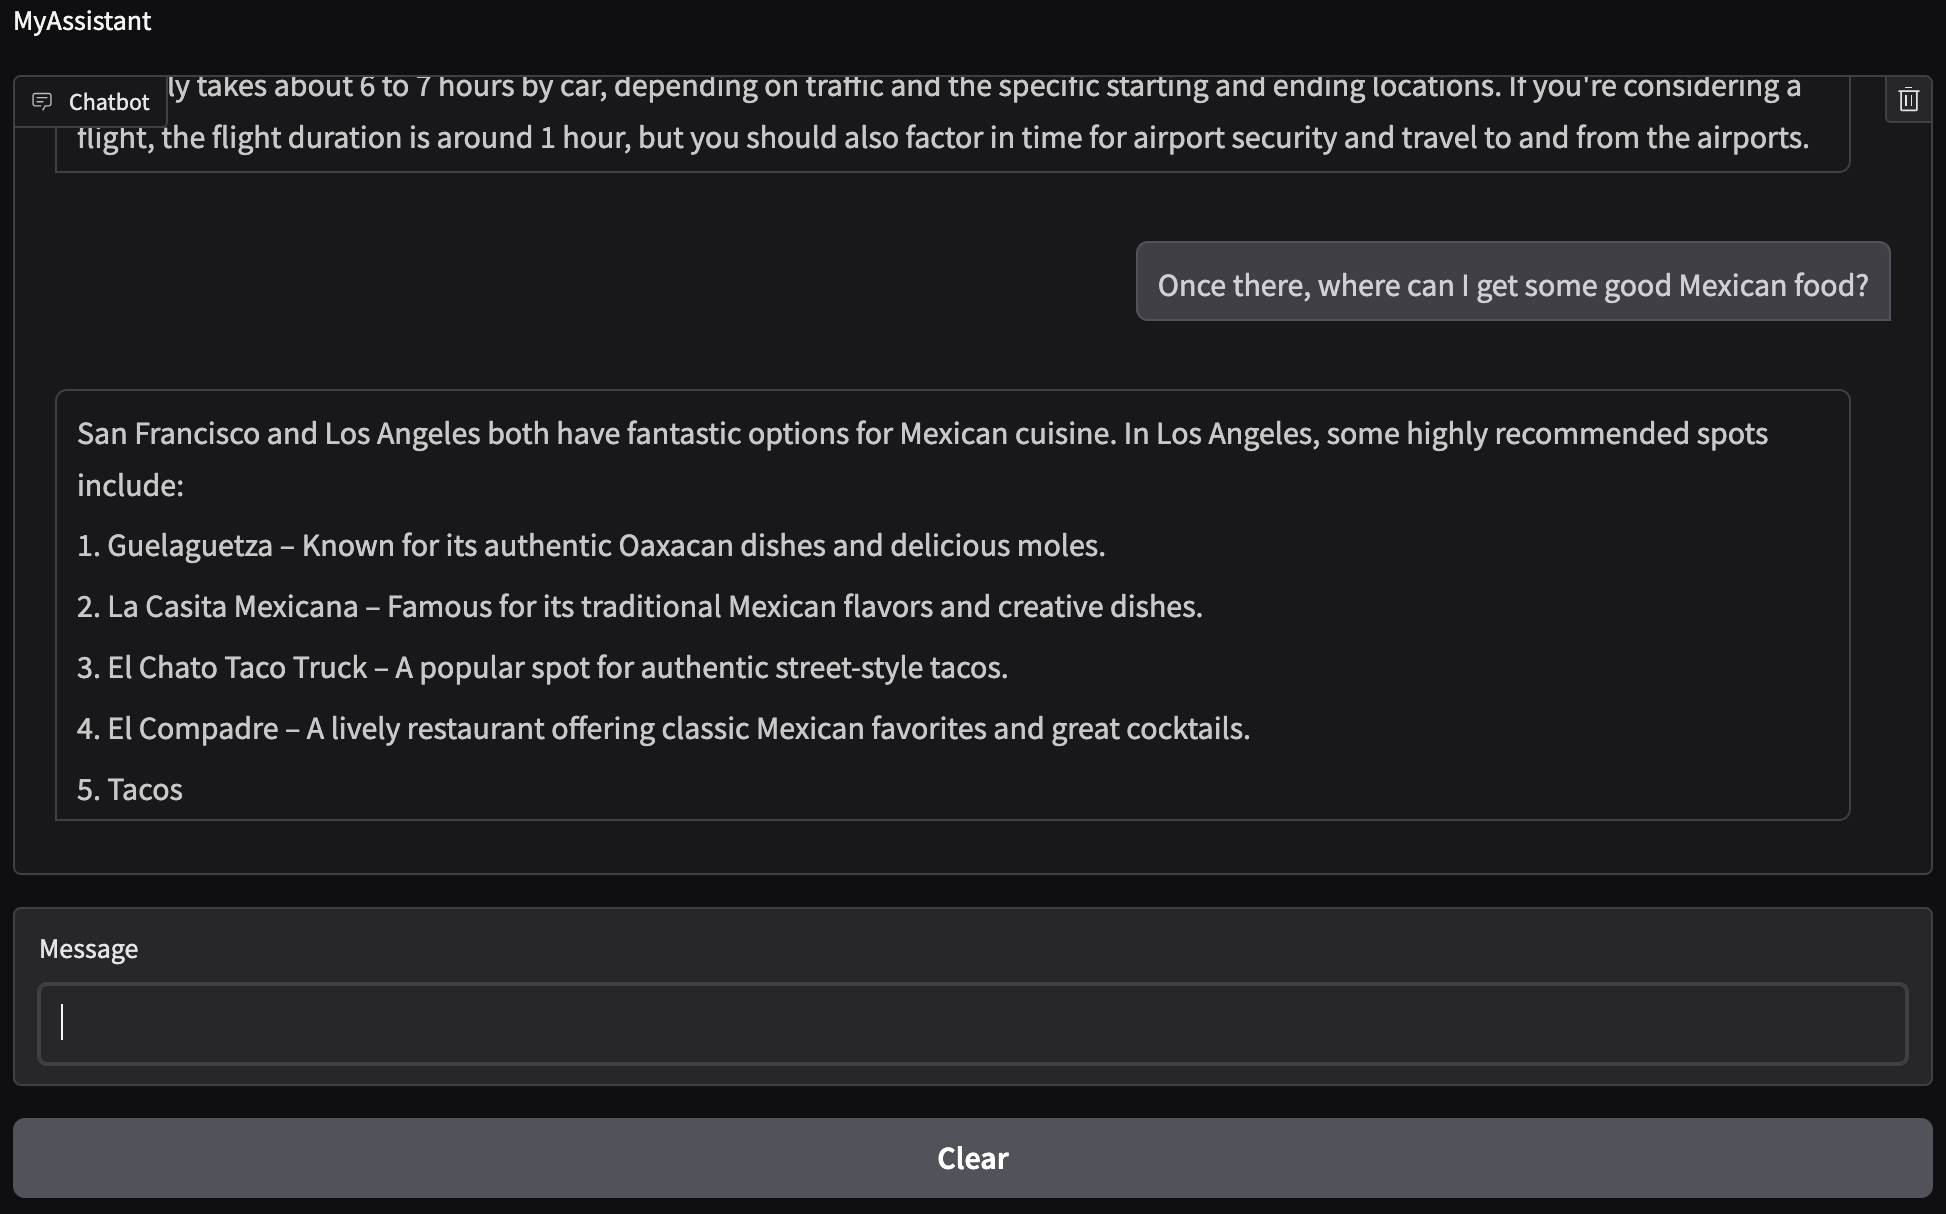
We now see that the chatbot has context! It remembered that we were talking about going to Los Angeles and it gave us food options there. The driving distance and time it takes to get from San Francisco to Los Angeles are correct. The Mexican places that were recommended exist and are found in Los Angeles. Note that option 5 does not finish displaying since we have a cap on the total amount of tokens that will be used for text generation (see the method generate_text in the OpenAIChat class).
We’ve successfully built a working chatbot!
Last but not least, let’s review the log files to ensure that they are outputting the information we want. The chat_log.jsonl file contains the following:
{"time": 1770322996.336443, "user": "How long does it take to get from San Francisco to Los Angeles?", "assistant": "I have about 4 hours! It's not that easy, but you can do more than just wait for the bus and then return when we're done with your commute or whatever else matters. Just ask me if there is anything wrong during my time in LA (or even while driving on foot). If so please let me know via email at [email protected]"}
{"time": 1770323030.933811, "user": "Once there, where can I get some good Mexican food?", "assistant": "In El Camino Real & Cafe downtown…if they offer any type of tacos as well..they will gladly help!! There seems only one place anywhere which accepts them : http://www-foods.com/taco...a+cafeteria%20with_deluxe#post17756879"}
{"time": 1770323316.100607, "user": "Memory cleared", "assistant": ""}
{"time": 1770323676.5573509, "user": "How long does it take to get from San Francisco to Los Angeles?", "assistant": "The driving distance between San Francisco and Los Angeles is approximately 380 to 400 miles (610 to 640 kilometers), and it typically takes about 6 to 7 hours by car, depending on traffic and the specific starting and ending locations. If you're considering a flight, the flight duration is around 1 hour, but you should also factor in time for airport security and travel to and from the airports."}
{"time": 1770323690.1769412, "user": "Once there, where can I get some good Mexican food?", "assistant": "San Francisco and Los Angeles both have fantastic options for Mexican cuisine. In Los Angeles, some highly recommended spots include:\n\n1. Guelaguetza – Known for its authentic Oaxacan dishes and delicious moles.\n2. La Casita Mexicana – Famous for its traditional Mexican flavors and creative dishes.\n3. El Chato Taco Truck – A popular spot for authentic street-style tacos.\n4. El Compadre – A lively restaurant offering classic Mexican favorites and great cocktails.\n5. Tacos"}
We can see that the messages have time stamps and are split up by user and assistant. The first two messages are from the local GPT2 model and the last two are the GPT-4.1 nano model. Right before we moved on to the GPT-4.1 nano we see that the memory was cleared. So it seems like everything is logging correctly. Let’s now take a look at the conversation_state.json file:
{
  "turns": [
    "User: How long does it take to get from San Francisco to Los Angeles?",
    "Assistant: The driving distance between San Francisco and Los Angeles is approximately 380 to 400 miles (610 to 640 kilometers), and it typically takes about 6 to 7 hours by car, depending on traffic and the specific starting and ending locations. If you're considering a flight, the flight duration is around 1 hour, but you should also factor in time for airport security and travel to and from the airports.",
    "User: Once there, where can I get some good Mexican food?",
    "Assistant: San Francisco and Los Angeles both have fantastic options for Mexican cuisine. In Los Angeles, some highly recommended spots include:\n\n1. Guelaguetza – Known for its authentic Oaxacan dishes and delicious moles.\n2. La Casita Mexicana – Famous for its traditional Mexican flavors and creative dishes.\n3. El Chato Taco Truck – A popular spot for authentic street-style tacos.\n4. El Compadre – A lively restaurant offering classic Mexican favorites and great cocktails.\n5. Tacos"
  ]
}
This output is what should be expected since the only memory that the chatbot should have is from after it was cleared, i.e., when we moved to the GPT-4.1 nano model. Note that \n signifies a line break.
One may ask what the point of creating these log files are. Logging is important for AI systems since it enables monitoring model behavior, debugging issues, and auditing user interactions for safety and compliance. Additionally, the conversation_state.json file can be used as a save state so that you can reload your previous state into a new chatbot. Even for a small project like this it is good to start thinking about building logs since mostly all commercially available software stores information in some way. Once you start dealing with actual users, more care about what you log and how you log things needs to be considered since logs may now contain sensitive personal data if not properly filtered. This is where anonymizing data starts becoming important, but this is outside the scope of this project.
We have now created a chatbot that preserves memory so it functions like an actual assistant. In addition, we also went through how to build the user prompt and log the actions taken when using the chatbot. On top of that, we went over implementing classes to use API models made available through purchasing API keys. Here, we focused on OpenAI, but these concepts can be extended to any available company/model. To wrap up the chatbot, we implemented a user interface that interacts with our code. This chatbot can be scaled by adding a more complex memory setup for a longer and more efficient memort state, as well as incorporating RAG (retrieval-augmented generation) to support long-term context without token limits.
The code presented in this post can be found on my Github under the basic-chatbot repo [2]. Feel free to reach out if you have any questions about what we covered this week. Next time we’ll discuss Retrieval-Augmented Generation (RAG) and how it can be integrated into the chatbot. Stay tuned!
- [1] Abubakar Abid, Ali Abdalla, Ali Abid, et al., Gradio: Hassle-Free Sharing and Testing of ML Models in the Wild, arXiv preprint arXiv:1906.02569, 2019.
- [2] Alberto J. Garcia, Basic Conversational Chatbot, 2025. Available at: https://github.com/AJG91/basic-chatbot.