Convolutional neural networks: MNIST dataset with machine learning pipeline
September 14, 2025
Last week we went over how to construct a convolutional neural network (CNN) and applied the model to the MNIST dataset. This week I will show you how to modify the code to create a machine learning pipeline and well-documented. As before, here is the documentation for the function that we will be using to load the MNIST dataset.
The process of refactoring and creating a pipeline is important because, if done correctly, it can save time and reduce errors. A code pipeline creates an automated and efficient system. By standardizing the workflow, the amount of errors will be reduced and, if there is an error, it will be easier to pinpoint and fix. It also makes starting future projects easier by allowing the use of the different components of the pipeline along different projects, thus speeding up the coding process and not reinventing the wheel. Another key feature of creating code pipelines is that it makes it simple to try different algorithms, hyperparameters, or preprocessing steps by keeping the workflow consistent.
The importance of documenting your code is something that cannot be stressed enough. Oftentimes, one finds that they come back to different pieces of code that they wrote a few months and have to take time to figure out what they did, which can be time consuming. The lack of documentation can be even more stressful when working with other people’s code that isn’t documented. Today I will show you how I document my code. I will also show a cool way to store parameters. I will be using the same CNN, same dataset, and same random seed to make sure that our changes do not affect the output.
First, let’s look at how to store parameters. I will present one way, but there are many different ways. In my case, I use the function SimpleNamespace and a .yaml file.
Here’s the .yaml file I am using in this particular case:
path: '../outputs/'
seed: 42

split_size: 0.1
batch_size: 64
learning_rate: 0.001
epochs: 3

input_size: 1
output_size: 10
hidden_size: 128
The first thing we see is the path where we will be outputting the plots to. We also have the seed to seed all random number generators. The next batch are parameters used for splitting the dataset, the learning rate for the optimizer, and the number of times we will train the model. The last batch of parameters indicate the different sizes that we need to build our CNN.
from types import SimpleNamespace

dpi = 400
dataset = 'mnist'

config = load_config(path=f'../config_{dataset}.yaml')
cfg = SimpleNamespace(**config)
print(json.dumps(vars(cfg), indent=2))

set_seed(cfg.seed)
device = "cuda" if tc.cuda.is_available() else "cpu"
We load the .yaml file into the variable config as a dictionary. This variable is then passed into the function SimpleNamespace. The double asterisk unpacks the key-value pairs as keyword arguments into the variable cfg, allowing us to call the parameters as attributes of cfg. This is pretty neat! Now all the parameters are stored in one place. All you have to do is call them from cfg as is shown in the function call set_seed(cfg.seed). We also specify the device that will be used, writing the code in such a way so that CUDA is the desired choice if available.
Next, we initialize the model, optimizer, loss function, and get our train, validation, and test dataloaders.
cnn = SimpleCNN(cfg.input_size, cfg.output_size, cfg.hidden_size).to(device)
optimizer = optim.AdamW(cnn.parameters(), lr=cfg.learning_rate)
loss_fn = nn.CrossEntropyLoss()

train, val, test = get_dataloaders(dataset, cfg.split_size, cfg.batch_size, cfg.seed)
Overall, this should be self-explanatory since it’s the same process as shown in last week’s post, but now we have a function for getting the dataloaders. Let’s look at this function closely. I will use this function and the subsequent classes used in get_dataloaders to explain creating a machine learning pipeline and documenting the code. I won’t go over every detail, but will focus on what I feel is important to understand. I will start out by showing each individual component of get_dataloaders, then show the full function at the end. For subsequent classes, I will only show the relevant subset of the class. Let’s get started:
def get_dataloaders(
    dataset: str,
    split_size: float = 0.1,
    batch_size: int = 64,
    seed: int = 42,
    **kwargs
) -> Tuple[DataLoader, DataLoader, DataLoader]:
First, let’s look at the header. If you contrast the inputs with my previous codes, you see that I now show the data types of the inputs. This is called type hinting. It allows one to quickly understand what kind of inputs the function expects. For example, I can have a function header such as
def add(x, a, b):
While we can probably guess that we are adding numbers, what if the function looked like the following:
def add(x, a, b):
    return x[a] + x[b]
if we would have passed floats into a and b, it would have resulted in an error. Imagine instead we wrote:
def add(x: numpy.ndarray, a: int, b: int) -> float:
    return x[a] + x[b]
Now we know that x is a numpy array, a is an integer, b is an integer, and the resulting output is a floating point. While we may still need to look at the documentation to get more information on the function, at least we wouldn’t have made the initial error of passing in floats.
Looking back at the get_dataloaders function, we see that dataset is a string. If there was no type hinting we might have thought it was the actual dataset that was being passed into the function. We can also see that split_size is a float and has a default value, and batch_size and seed are integers with default values, as well. The expected output of the function is also shown and is a tuple composed of three dataloaders. At a glance, we immediately have more information about the function compared to if it did not have type hinting.
From here, we look at the docstring, which is the documentation:
"""
Create PyTorch DataLoaders for training, validation, and test sets.

Parameters
----------
dataset : str
    Name of the dataset to load.
split_size : float, optional (default=0.1)
    The fraction of data that will be split off for the validation/test set.
batch_size : int, optional (default=64)
    Number of samples per batch.
seed : int, optional (default=42)
    Random seed for reproducible splitting of the dataset.
**kwargs
    Additional keyword arguments.

Returns
-------
train_loader : DataLoader
    DataLoader for the training set, with shuffling enabled.
val_loader : DataLoader
    DataLoader for the validation set, without shuffling.
test_loader : DataLoader
    DataLoader for the test set, without shuffling.
"""
Basic documentation is broken down into three parts: description, inputs, and outputs. One can get more sophisticated with the docstring if one wishes, but let’s keep it basic for now. The description of this function is short and to the point. The function creates PyTorch DataLoaders for training, validation, and test sets. The input section is given by “Parameters” and shows the data type and gives a short description of each input variable and whether or not they have a default value (find optional in docstring). Here, I don’t have arrays (or tensors), but if one does it is always good to include the expected shape of the array in the short description. The final section is given by “Returns” and displays the outputs of the function with the data type and short description of each output variable just like with the inputs.
At this point we know exactly what the function does, the different data types involved, and the inputs and outputs of the function. Now, all that’s left is the code itself so that we can capture all the details of the function.
data = PreprocessDataset(dataset, split_size, rand_seed=seed, **kwargs)
return (
    DataLoader(TensorDataset(data.X_train, data.y_train), batch_size=batch_size, shuffle=True),
    DataLoader(TensorDataset(data.X_val, data.y_val), batch_size=batch_size),
    DataLoader(TensorDataset(data.X_test, data.y_test), batch_size=batch_size)
)
Here, we see that we call PreprocessDataset with the dataset, which returns an object data with the training, validation, and test data as attributes. These attributes are then passed into TensorDataset and DataLoader like in my previous post. The order of the dataloaders in the output tuple are (train, validation, test). Combining the header, docstring, and code gives us the full function:
def get_dataloaders(
    dataset: str,
    split_size: float = 0.1,
    batch_size: int = 64,
    seed: int = 42,
    **kwargs
) -> Tuple[DataLoader, DataLoader, DataLoader]:
    """
    Create PyTorch DataLoaders for training, validation, and test sets.

    Parameters
    ----------
    dataset : str
        Name of the dataset to load.
    split_size : float, optional (default=0.1)
        The fraction of data that will be split off for the validation/test set.
    batch_size : int, optional (default=64)
        Number of samples per batch.
    seed : int, optional (default=42)
        Random seed for reproducible splitting of the dataset.
    **kwargs
        Additional keyword arguments.

    Returns
    -------
    train_loader : DataLoader
        DataLoader for the training set, with shuffling enabled.
    val_loader : DataLoader
        DataLoader for the validation set, without shuffling.
    test_loader : DataLoader
        DataLoader for the test set, without shuffling.
    """
    data = PreprocessDataset(dataset, split_size, rand_seed=seed, **kwargs)
    return (
        DataLoader(TensorDataset(data.X_train, data.y_train), batch_size=batch_size, shuffle=True),
        DataLoader(TensorDataset(data.X_val, data.y_val), batch_size=batch_size),
        DataLoader(TensorDataset(data.X_test, data.y_test), batch_size=batch_size)
    )
It’s definitely more verbose than if I just included the code portion, but there is now so much information embedded in it that will be useful when it comes time to use this function!
Let’s now take a look at a subset of the class PreprocessDataset:
class PreprocessDataset(Dataset):
    """
    Preprocess a dataset and provide train, validation, and test splits as PyTorch tensors.

    Attributes
    ----------
    X_train : tc.Tensor
        Training input features.
    y_train : tc.Tensor
        Training labels.
    X_val : tc.Tensor
        Validation input features.
    y_val : tc.Tensor
        Validation labels.
    X_test : tc.Tensor
        Test input features.
    y_test : tc.Tensor
        Test labels.

    Parameters
    ----------
    dataset : str
        Name of the dataset to load.
        Options: 'MNIST', 'MEDMNIST'
    split_size : float, optional (default=0.1)
        The fraction of data that will be split off for the validation/test set.
    rand_seed : int, optional (default=42)
        Random seed for reproducible splitting.
    **kwargs
        Additional keyword arguments.
    """
    def __init__(
        self,
        dataset: str,
        split_size: float = 0.1,
        rand_seed: int = 42,
        **kwargs
    ):
        loader = LoadDatasets(dataset, **kwargs)
        X, y = loader.X / 255.0, loader.y

        X_train, X_val, y_train, y_val = self._split_dataset(X, y, split_size, rand_seed)
        X_train, X_test, y_train, y_test = self._split_dataset(X_train, y_train, split_size, rand_seed)

        self.X_train, self.y_train = X_train, y_train
        self.X_val, self.y_val = X_val, y_val
        self.X_test, self.y_test = X_test, y_test

    def _split_dataset(
        self,
        X: tc.Tensor,
        y: tc.Tensor,
        split_size: float,
        rand_seed: int
    ) -> Tuple[tc.Tensor, tc.Tensor, tc.Tensor, tc.Tensor]:
        """
        Split the dataset into train/test or train/validation subsets.

        Parameters
        ----------
        X : tc.Tensor
            Input features.
        y : tc.Tensor
            Target labels.
        split_size : float
            The fraction of data that will be split off for the validation/test set.
        rand_seed : int
            Random seed for reproducibility.

        Returns
        -------
        X_train : tc.Tensor
            Features of the first split.
        X_test : tc.Tensor
            Features of the second split.
        y_train : tc.Tensor
            Labels of the first split.
        y_test : tc.Tensor
            Labels of the second split.
        """
        return train_test_split(X, y, test_size=split_size, random_state=rand_seed)
The main docstring for a class documents the constructor. Then, each individual function has it’s own docstring. Looking at the constructor docstring, you will see that we have now included “Attributes”. These are instance attributes that belong to the class objects. This essentially means you can do things like:
data = PreprocessDataset('mnist')
X_train, y_train = data.X_train, data.y_train
where data is the object and X_train and y_train are the attributes. In the case of this class, we have six instance attributes, which are our data sets. The docstring for these attributes is written in the same way as “Parameters” and “Returns”*. Note that the docstring says that the variable datasets can either be ‘MNIST’ or ‘MEDMNIST’. More about this later. One can also choose to give a brief summary for each method in the class in the constructor docstring, but I will not be doing this.
In the constructor, we instance an object loader from the LoadDatasets class (which we will see in a bit). The instance attributes tied to the loader object are the x and y datasets. We then use these and call the method _split_dataset, which will now give us our train, validation, and test sets. The underscore in the method name indicates that this is meant to be an internal method that should not be accessed from outside the class. Python does not enforce this so it can still be called from outside the class if you so wish, but if you find yourself purposely writing underscores to call methods outside of the class constructor or other methods you may want to rethink your coding pipeline. For the last part of the constructor, we turn the different data sets into instance attributes. This is easily done by writing self.X_train = X_train for all variables you want to save.
At this point you may be thinking to yourself, “This is so complicated!! Why are we doing all this if our previous code, without functions and classes, worked just fine?” As Yoda would say, “patience you must have, my young Padawan.” Let’s look at the last class, LoadDatasets and hopefully everything becomes clear.
class LoadDatasets():
    """
    Load and return datasets as PyTorch tensors.

    Attributes
    ----------
    dataset : str
        Name of the dataset to load (e.g., 'MNIST', 'MEDMNIST').
    X : tc.Tensor
        Input features of the dataset as a PyTorch tensor.
        shape: (num_samples, channels, height, width)
    y : tc.Tensor
        Target labels as a PyTorch tensor.

    Parameters
    ----------
    dataset : str
        The name of the dataset to load.
        Options: 'MNIST' or 'MEDMNIST'
    **kwargs
        Additional keyword arguments passed to the specific dataset loader methods.

    Raises
    ------
    ValueError
        If an unsupported dataset name is provided.
    """
    def __init__(self, dataset: str, **kwargs):
        self.dataset = dataset.upper()
        self.loaders = {
            'MNIST': lambda: self.load_mnist(**kwargs),
            'MEDMNIST': lambda: self.load_medmnist(**kwargs),
        }

        if self.dataset not in self.loaders:
            raise ValueError(f'Dataset not supported -> {dataset}. '
                             f'Available: {list(self.loaders.keys())}')

        self.X, self.y = self.loaders[self.dataset]()

    def load_mnist(self, version: int = 1) -> Tuple[tc.Tensor, tc.Tensor]:
        """
        Load the MNIST dataset and convert it to PyTorch tensors.

        Parameters
        ----------
        version : int, optional (default=1)
            The version of the MNIST dataset from OpenML.

        Returns
        -------
        X : tc.Tensor
            MNIST images as a float32 tensor normalized to [0, 1].
            Shape: (num_samples, 1, 28, 28)
        y : tc.Tensor
            MNIST labels as int64 tensor.
            Shape: (num_samples,)
        """
        from sklearn.datasets import fetch_openml

        X, y = fetch_openml('mnist_784', version=version, return_X_y=True, as_frame=False)
        X = tc.tensor(X, dtype=tc.float32)
        y = tc.from_numpy(y.astype('int64'))
        return X.view(-1, 1, 28, 28), y

    def load_medmnist(self, flag: str = 'bloodmnist') -> Tuple[tc.Tensor, tc.Tensor]:
        """
        Load a MedMNIST dataset and convert it to PyTorch tensors.

        Parameters
        ----------
        flag : str, optional (default='bloodmnist')
            Specifies which MedMNIST dataset to load.
            Must be one of the keys in `medmnist.INFO`.

        Returns
        -------
        X : tc.Tensor
            MedMNIST images as a float32 tensor normalized to [0, 1].
            Shape: (num_samples, channels, height, width)
        y : tc.Tensor
            MedMNIST labels as long tensors.
            Shape: (num_samples,)

        Raises
        ------
        ValueError
            If the specified `flag` does not correspond to a valid MedMNIST dataset.
        """
        import medmnist
        from medmnist import INFO

        if flag not in INFO:
            raise ValueError(f'Invalid MedMNIST flag -> {flag}. '
                             f'Available datasets: {list(INFO.keys())}"')

        print(INFO[flag]['label'])
        DataClass = getattr(medmnist, INFO[flag]['python_class'])

        train_ds = DataClass(split='train', download=True)
        val_ds = DataClass(split='val', download=True)
        test_ds = DataClass(split='test', download=True)

        X = np.concatenate([train_ds.imgs, val_ds.imgs, test_ds.imgs], axis=0)
        y = np.concatenate([train_ds.labels, val_ds.labels, test_ds.labels], axis=0)

        X = tc.tensor(X, dtype=tc.float32)
        y = tc.tensor(y).long().squeeze()
        return X.permute(0, 3, 1, 2), y
In the docstring for this class I have included yet another section, “Raises”. By seeing this we know that somewhere in the constructor there will be a piece of code that will potentially raise an error if something is wrong. The docstring says that this will happen if an unsupported dataset name is provided. Aha! So If I pass in an incorrect string or a string that does not match a known dataset in the class an error will be raised.
Looking at the constructor, we see that the dataset string is capitalized. This is to prevent case sensitivity raising an error. The dataset name is passed into a dictionary that calls the method that corresponds to the dataset being asked for. We also see that the methods are called via lambda function. The reason is so that if we have parameters that we need to pass into the dataset methods we can do it as a keyword argument (a.k.a. kwargs). For example, take MEDMNIST, which is a library of medical datasets. An input to the method is the specific MEDMNIST dataset that we want. In this case, the default option is “bloodmnist”. If instead we wanted ChestMNIST, then we pass in “chestmnist” as a keyword argument into get_dataloaders. If no keyword arguments are passed in, then the lambda function is treated as if it was a regular method call.
So let’s review the function and classes used for obtaining the dataloaders. The get_dataloaders function calls the PreprocessDataset class. This class is solely used for grabbing the already loaded features and targets, normalizing, and splitting them into train, validation, and test sets. The PreprocessDataset class calls the LoadDatasets class, which is solely used for loading the features and targets from their respective Python package. The classes do not care about the inner workings of each other. PreprocessDataset only cares that there is a class with the feature and target variables as attributes. On the other hand, LoadDatasets can be called independently from everything else if one only wants the feature and target variables. This way of modularizing code helps once projects start getting big and pipelines get complicated. It keeps everything in such a way so that you can swap out functions or classes with ease. You don’t have everything tangled up together, which can result in headaches when making changes.
Another cool thing is that adding datasets to LoadDatasets is a breeze. All you have to do is write a function in the class that outputs the feature and target variables with the shape $\text{X.shape} = (\text{num_samples}, \text{channels}, \text{height}, \text{width})$ and $\text{y.shape} = (\text{num_samples},)$ and add the dataset to the dictionary in the constructor. From there, getting the dataloaders for this new dataset is as easy as calling get_dataloaders and passing in the appropriate name. You don’t have to copy over you preprocessing pipeline or the train_test_split function.
I won’t go over the functions train_model and evaluate_model since they are pretty self-explanatory and the bulk of it was covered last week. What I do want to show are the train, validation, and test results:
Epoch 1, Train Accuracy: 0.88814815, Validation Accuracy: 0.94385714
Epoch 2, Train Accuracy: 0.95839506, Validation Accuracy: 0.96385714
Epoch 3, Train Accuracy: 0.97007055, Validation Accuracy: 0.96928571
Test Accuracy: 0.97190476
We note that they are the same as last week! This means that our code refactoring did not fundamentally change anything in the model, which is great validation that we did not introduce a bug into the code. The misclassified images are also the same:
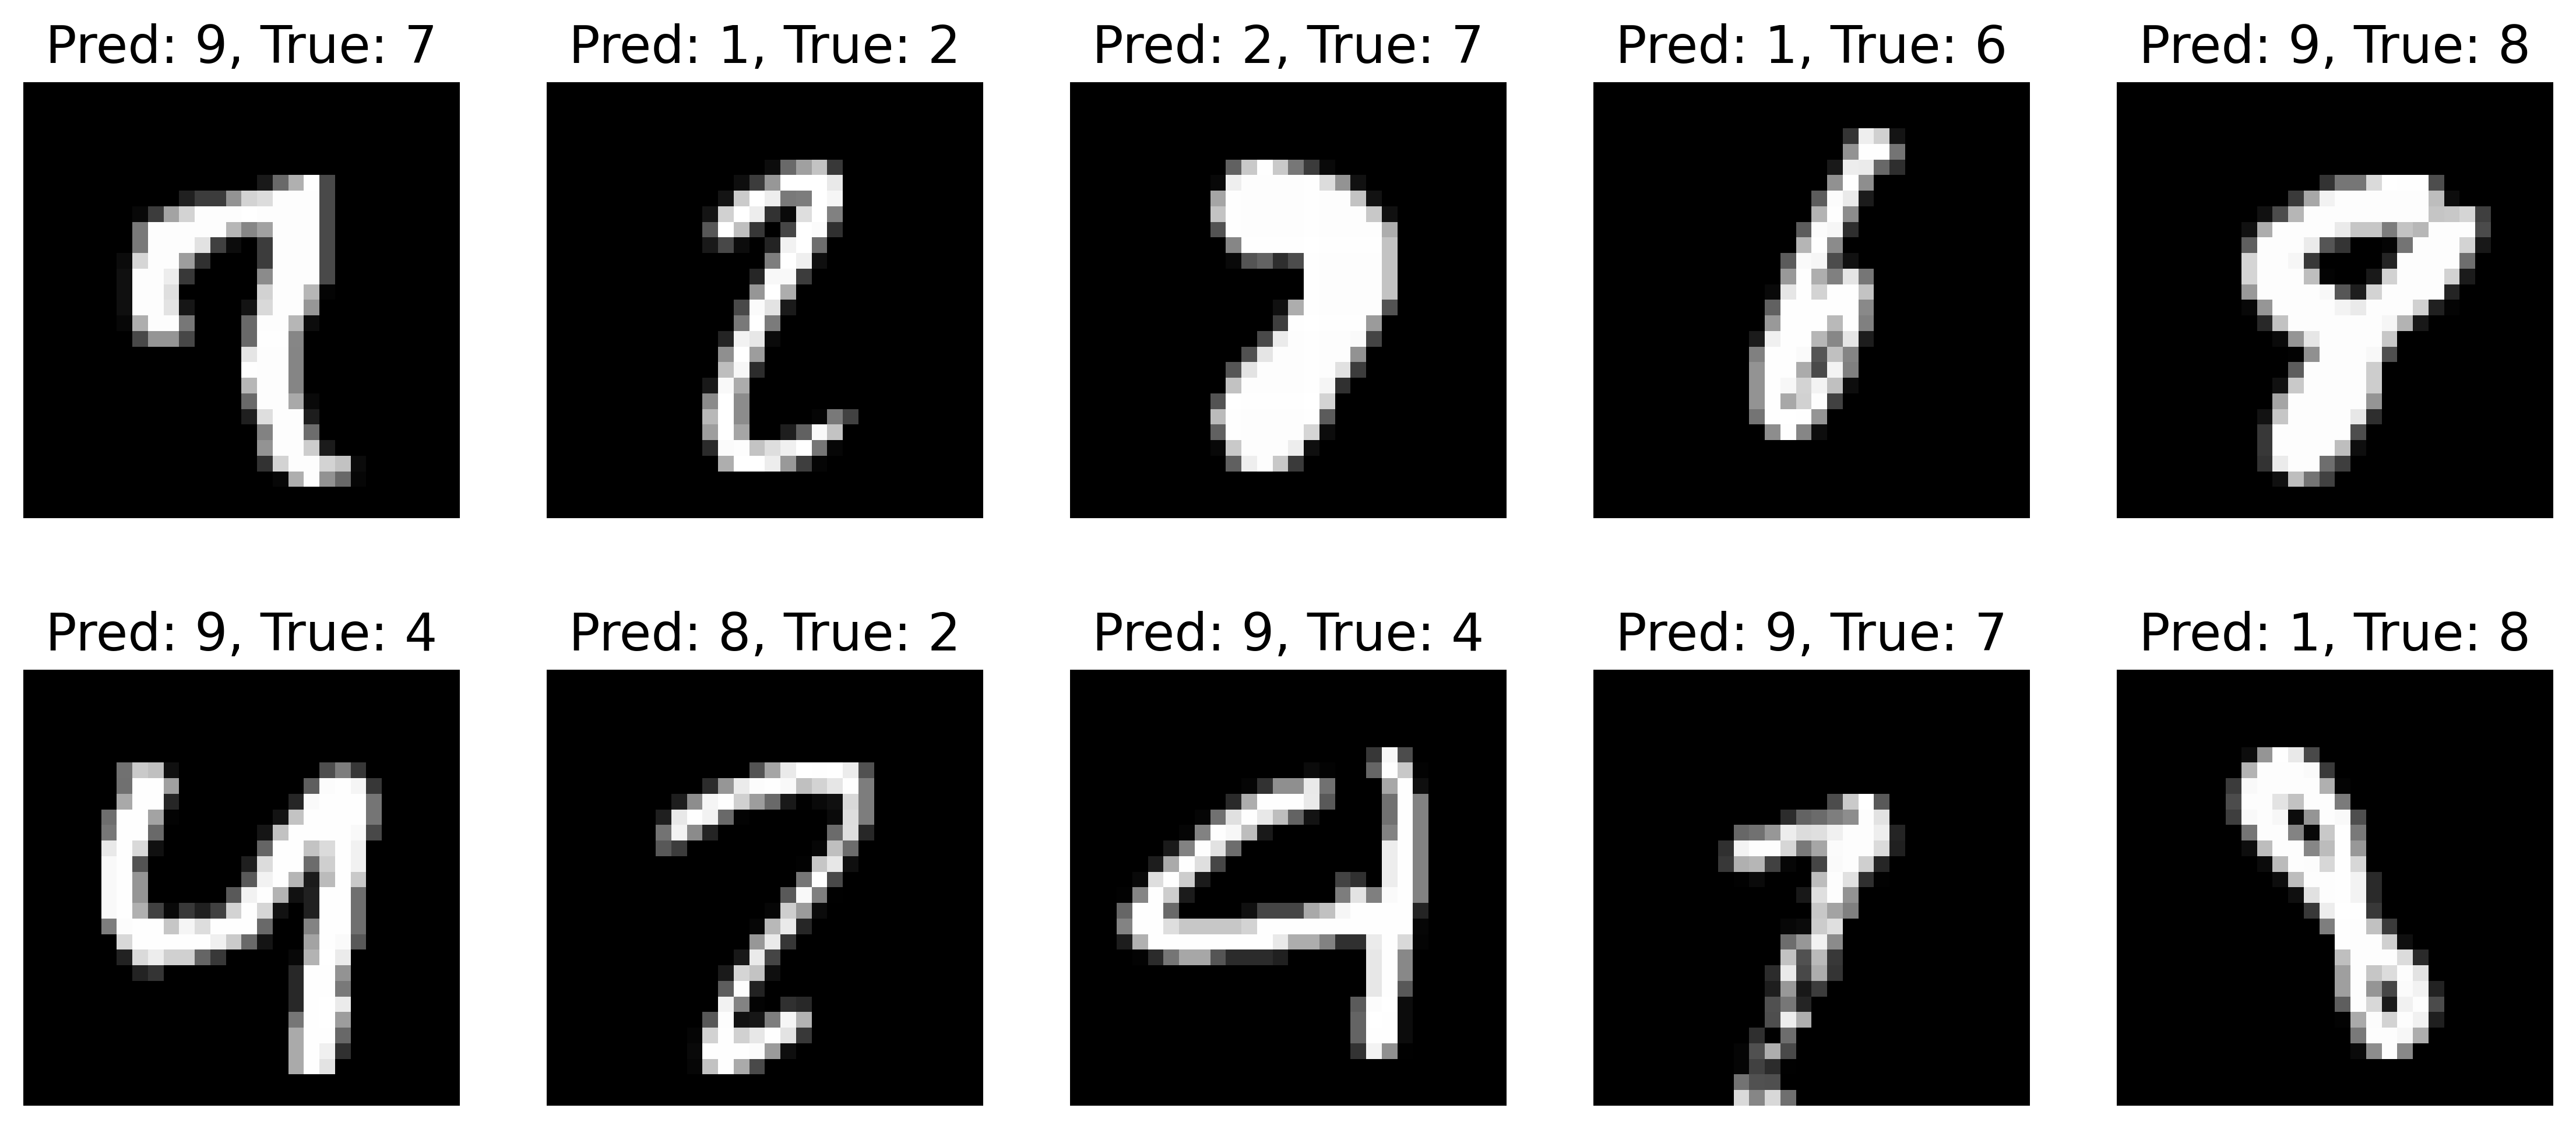
which is to be expected since we are seeding all the random number generators. All is well. The cool thing is that all the training and evaluation code is agnostic to the dataset, which means that you can use it on other datasets with very minimal tweaks!
The functions used to produce the plots are also written in such a way as to allow flexibility when using different datasets. I will only go over one of the functions:
def plot_images(
    loader: tc.utils.data.DataLoader,
    path: str,
    dpi: int,
    data: str,
    size: list = [2, 5],
    figsize: Tuple = (14, 6),
    cmap: str = None
) -> None:
    """
    Plots a subset of the dataset images.

    Parameters
    ----------
    loader : tc.utils.data.DataLoader
        DataLoader for the training set.
    path : str
        String to the directory where the plot is saved.
    dpi : int
        Dots per inch.
        A higher dpi results in a sharper image.
    data : str
        The name of the dataset being plotted.
        This is used to label the plot when saving to directory.
    size : list, optional (default=[2, 5])
        Specifies the number of rows and columns.
    figsize : Tuple, optional (default=[14, 6])
        Specifies the figure size.
    cmap : str, optional (default=None)
        Colormap for 2D images.
    """
    images, labels = next(iter(loader))

    fig, axes = plt.subplots(size[0], size[1], figsize=figsize)
    for i, ax in enumerate(axes.flat):
        img = images[i].permute(1, 2, 0)
        if img.shape[-1] == 1:
            img = img.squeeze()
            cmap = 'gray'

        ax.imshow(img, cmap=cmap)
        ax.set_title(f"Label: {labels[i].item()}", fontsize=16)
        ax.axis('off')
    plt.show();

    fig.set_constrained_layout_pads(w_pad=0.01, h_pad=0.01)
    fig.savefig(path + f'example_image_{data}.png', bbox_inches='tight', dpi=dpi)
I won’t belabor the type hinting and docstring, but I do want to point out something we didn’t seen in the previous examples, which is loader: tc.utils.data.DataLoader. This way of type hinting happens when the object being passed into the function is not some straighforward data type like an integer or float. In this case, you can simply write what one would write if they want to import that object. Here, I have already imported torch as tc so I simply need to complete the path to import DataLoader and use that as the type hint.
Let’s jump to the code portion since we have pretty much already discussed type hinting and docstrings. The function is written in such a way as to allow someone to pass in grayscale or color images. This can be seen from the following line: if img.shape[-1] == 1:. This if-statement checks if the image is grayscale, and, if so, it squeezes the single channel input portion so that a 2D image can be plotted. If the last element size is not $1$, there is no squeezeing and the plots are shown in color with the $3$ input channels. The final line saves the plot to a folder and appropriately labels it based on the data that was passed in.
Summary:
So we’ve gone over quite a bit in this blog post. We first discussed how to save parameters in a yaml file, how to import them into the workspace, and how to turn them into attributes of an object. We went over type hinting and writing docstrings for functions and classes, as well as implementing a machine learning pipeline for easier project deployment. To be sure we did not introduce any errors in the code, we ran the same example as in the previous week and got the same outputs, which means our refactoring did not introduce any bugs. Overall, we’ve managed to take a specific problem and create a pipeline that can then be applied to a wide variety of datasets.
The code presented and plots displayed in the Convolutional neural network with the MNIST dataset posts can be found on my Github under the build-cnn repo.
Feel free to reach out if you have any questions about what we covered this week. I will take a break the next two weeks and come back the following week with hyperparameter tuning and model debugging. Stay tuned!